Microsurgery Essentials: Intra-Operative Technique
-
- Coupler provides a fast, reliable anastomosis. Useful for veins (greater than 1 mm in size).
- Clean adventitia off the ends of the vessels
- Measure the caliber of the smaller of the two veins. Select appropriately sized coupler (range from 1 to 4 mm). Err on the side of a small coupler.
- Pay attention to the orientation of the veins to prevent kinking.
- Start with the longer or more mobile vein first.
- Pull the end of the first vein through the coupler lumen.
- Evert the vessel over the pins, and then secure the vessel on to the pins using the coupler forceps. Gentle traction is used to visualize the lumen of the vessel.
- Repeat the process for the second vein.
- Close the coupler. Use a hemostat for a final squeeze to ensure closure.
- Retract the device
- Inspect the anastomosis for complete and even closure.
Arterial Anastomosis (4 mm vessels, recipient vessel = lingual artery)
-
- Dilate vessels
- Clean off adventitia from vessel ends
- Apply clamp to both vessel ends
- Anterior wall anastomosis first
- Place first stay suture
- Place left hand forceps into vessel lumen to guide you
- Never grab vessel with forceps
- Suture is placed in 2 passes
- Throw surgeon’s knot with first knot
- Throw two additional square knots
- Do not let go of suture with your left hand forceps
- Cut short tail
- Wrap long tail around background
- Place second stay suture
- 180 degrees from first stay suture
- Wrap long tail around background
- Place intervening sutures
- Space them evenly
- Should be able to fit 3-4 sutures depending on vessel size
- Pre-place all the stitches first
- Leave enough suture loop to allow tying
- Cut loops all at once
- Tie knots starting from the stay sutures and working toward the middle
- Three single knots. No surgeon’s knots. Be sure to square the knots.
- Place first stay suture
- Posterior wall anastomosis
- Place intervening sutures evenly spaced
- Release stay sutures
- Turn vessel over
- Infiltrate with papavarine
- Assess anastomosis
- Expect a small amount of bleeding. That's normal.
While you are suturing, take steps to avoid going through the back wall:
-
- Have the tip of your needle pointing horizontally along the surface of the vessel, never pointing down into it.
- Always see where the tip of your needle is going – never guess.
- Lift up the wall you are suturing to separate it from the back wall. You can lift up the wall by using the tips of your left-hand forceps inside the vessel, by picking up the adjoining suture, or by picking up the adventitia.
Patency Testing: ICG
-
- Indocyanine green (ICG) is injected into a peripheral vein. The vessels are illuminated with a laser, and the fluorescence is picked up by a charged couple device video camera. Flow is assessed by: (i) visual quality of the arterial anastomosis and flow, (ii) quality of the dye flow through the microcirculation of the flap and (iii) quality of the distal opacification distal to the venous anastomosis.
Additional means of patency testing that have been described:
- Observation: A patent artery should pulsate distal to the anastomosis. However, a pulsatile transmission could still carry through a thrombosed anastomosis. You can also gain reassurance by noting bleeding from flap edges, pink color, triphasic Doppler in skin over perforators.
- Flicker Test: Place a closed forceps beneath the vessel distal to the anastomosis. As you stretch and gradually occlude the vessel, you will see alternating collapse and filling of the vessel.
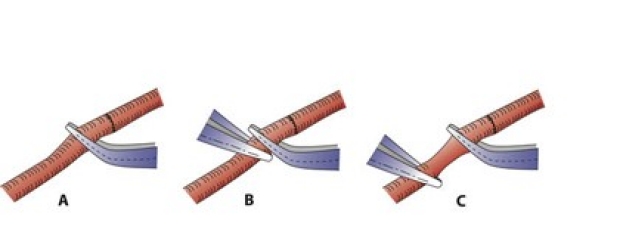
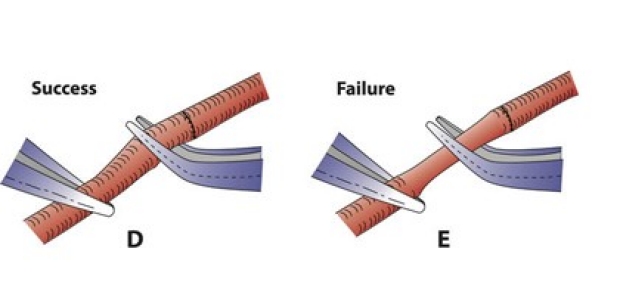
- Milking Test (Double Occlusion Test): This test is somewhat traumatic. Occlude the vessel with forceps distal to the anastomosis (A). Place another forceps just distal to the first (B). Milk the vessel for several millimeters away from the anastomosis (C). Occlude the emptied vessel, and release the proximal forceps. You should see rapid filling from proximal to distal (D). If you don't see rapid filling, then there is anastomotic failure (E).
Practical Points in the Operating Room
Positioning
- Set your chair height so your feet are flat on the floor
- Set your microscope height so your eyes are looking straight ahead
- Set the OR table height so your hands and wrists are comfortable
- Put folded towels under your elbows/forearms until they are comfortable.
- If the table will not go low enough to position your forearms horizontally, or if your wrists are hyperflexed to get into a hole, then you should stand up to do the microsurgery.
Minimizing Movement
- Pre-op: don’t smoke, usual amount of caffeine, avoid exercise 24 hours prior, get a good night of sleep.
- Intra-op:
- 3 point stability of elbows, wrists, and fingers
- Knot tying: stabilize forceps with needle holder when grasping short suture
- Suture cutting: stabilize scissors with forceps when cutting sutures.
- Patient movement:
- Have anesthesia paralyze patient to eliminate deep spontaneous breathing
- Ask anesthesia to give smaller tidal volumes
- If needed, have anesthesia stop ventilation during suture placement
Avoid Working in a Hole
- Extend your incision
- Further mobilize your recipient vessels more proximally
- Platform vessels: put multiple raytec sponges and cottonoids to bring vessels that are in a hole out to the surface
- Reposition self-retaining retractors to give wider exposure.
Keep Visual Field Dry
A bloody visual field makes every part of microsurgery more difficult, wastes time suctioning, results in more blood loss, and increases risk of thrombosis (by activating clotting cascades and platelet aggregation).
- Vessel dissection: bipolar before you cut, not after.
- Use heparinized saline dampened raytec sponges in depth of wound under vessels to soak up blood.
- Place heparinized saline dampened 1” cottonoids on top of raytec sponges to give a level surface for background material.
- Put background material on top of cottonoids and keep surface of background dry, using wec spheres.
Instruments and Supplies
- Confirm with the OR that they have all the equipment before starting the case.
- Equipment to include:
- Radial forearm flap: sterile tourniquet, dermatome
- Fibula flap: sterile tourniquet, oscillating saw, elevates, drill/bits, dermatome, mandible plating system.
- Internal mammary vessels: ronguers, elevators
- Gluteal flap: IM vessel exposure equipment, large hemoclips
- Make sure instruments are demagnetized
- If instrument tips are bent, discard them
- Keep micro instruments away from macro instruments
- Handle micro instruments individually. Never “grab” a bunch of them at once
- Make a “basket” for micro instruments lined with heparinized saline gauze
Suturing
- Position vessels (or your hands) so that vessels are perpendicular to your needle holder held in your hand with the wrist in neutral position.
- Platform vessels as far out of the hole as possible
- Hold free flap in the air and let vascular pedicle dangle to unwind twists
- Wrap the flap in ice cold saline soaked lap sponge to keep fat and muscle out of microscopic visual field
- Keep flap cold throughout ischemia time by topically irrigating wrapped flap with ice cold saline during microvascular surgery
Flap Reperfusion
- Rapidly rewarm with warm saline (> 37 degrees C)
- Topically irrigate adventitia with papavarine
- If bleeding occurs around vascular pedicle, be patient and don’t panic
- Look for unligated/cut side branches on artery and vein
- Long side branch: use small hemoclip or cauterize with bipolar
- Short side branch: Suture tie or suture ligature
- Look for bleeding from 2nd outflow vein from flap
- If bleeding from anastomosis
- Needle hole bleeding?: leave alone
- Gap?: Add another suture
- Look for unligated/cut side branches on artery and vein
Spasm
Spasm is common in both the artery and vein after reperfusion.
- Warm flap and pedicle with warm saline
- Topically apply papavarine (full strength if ½ strength not working)
- Stretch adventitia at point of narrowing
- Cut adventitia at point of narrowing
- Persistent spasm:
- Suspect damaged vessel.
- Excise damaged segment and re-do anastomosis with or without vein graft.
Background Material
Learn how to cut out the background material with triangular notches on either end. These will be used to anchor the stay sutures.